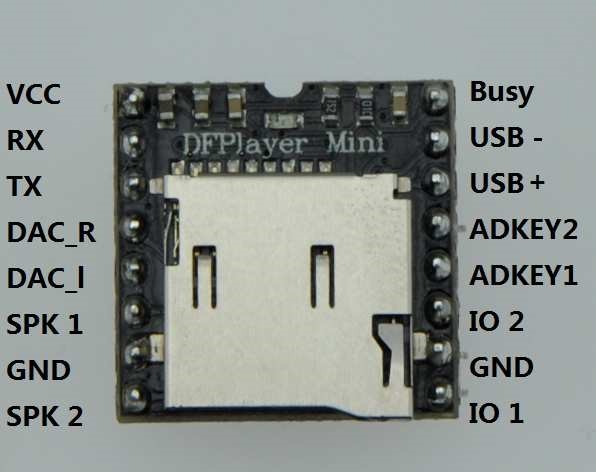
 The
module is a 16-pin PCB dominated by the TF card slot. It supports a UART
connection for commands, speaker and line outputs and a Busy signal, as
well as power and ground.
MP3 Player Module based on the GD3200B / MH2024 IC.
This project is still in prototype form, but this page has been created as a repository for the module documentation, and code as available.
As supplied, the documentation is lousy. It is poorly translated, incomplete, and wrong in parts. It includes almost no contextual information, and what is included is erratic and confusing.
Set out below ia a heavily edited version of the original documentation. It is based on extensive testing of the module with a TF card and both the single MP3 folder arrangement and the multiple-folder arrangement. It is not tested with the 'key' inputs, USB U-Disk or Flash source, or anything other than .mp3 files on a FAT32 system.
 The
module is a 16-pin PCB dominated by the TF card slot. It supports a UART
connection for commands, speaker and line outputs and a Busy signal, as
well as power and ground.
During prototyping it became apparent that the module is very sensitive to the pin connections. It is not clear why this should be, but the solution was to mount it in a ZIF socket.
Speaker output is a balanced pair and is mono only. The module is easily overloaded when using speakers - the quoted 3W is probably very optimistic. The DAC outputs are suitable for headphones or a line input. For development a pair of mini powered speakers was used.
The module is very sensitive to the power supply. The problem
manifests as a low frequency(~10Hz) clicking or a higher frequency
(~50/60Hz) buzzing. It is not clear whether this is injected from
the power supply or is due to some instability in the module itself.
Powering the module from battery doesn't seem to make a lot of difference,
and filtering doesn't seem to have much effect. The best arrangement
turned out to be an Arduino Pro-Mini running at 8Mhz and 3.3v as the MCU,
with the module powered from the Vcc pin of the MCU. This suggests that
some sort of mismatch between the MCU and the module creates the noise,
and that they need to be tightly tied together. Whatever arrangement is
adopted, the connections must be clean and tight.
It appears that the mini player was introduced by DFRobot and
subsequently cloned by many unnamed manufacturers. The original
chipset became unavailable and was replaced by the GD3200B, MH2024K-24SS
and possibly others. There are several versions, but as of 2020/2021 the
most common version seems to be the GD3200B with the MH2024-24SS a close
second. On-line suppliers seem to select between the two
randomly. They appears to be identical. This description
is based on a GD3200B, but is extensively tested with a
MH2024K-24SS. With the change from the original design a
rewrite of the software was required, and it appears that this may be the
source of many issues. It is worth noting that the original DFRobot
documentation does not mention the use of the module as a personal MP3
player - it is directed at commercial and industrial usage such as
standard message broadcasting, announcements, prompts etc. Some of
the commands that are applicable to usage as a MP3 player appear to be a
late addition. It is usage as a MP3 player that has been addressed in the
attached documentation.
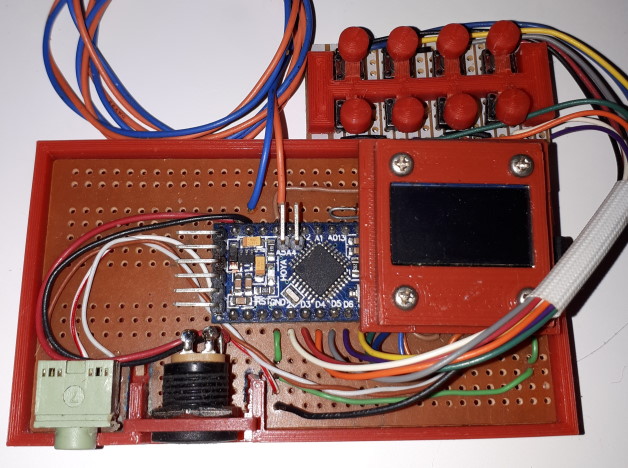
 The
player is built around the two main modules - the Arduino Pro Mini and the
MP3/SD module. The two modules are mounted to a piece of
perfboard and inserted into a case that also has the power connector and
the output socket. The MP3/SD card module is mounted hard up against
one edge so that the SD card will be accessible from outside the completed
case.
The perfboard includes the voltage divider network to ensure the correct
voltage for the MP3 UART Rx input.
The output socket is also soldered to the perfboard, but the power
socket needs a plate inserted into a slot molded in the side of the base,
in order to provide a secure mounting that is also easily removable during
development.
The OLED display is mounted in a frame for safety, and is set into the
lid of the case. The 5v/Gnd wiring is in place, but the control
wires (A4, A5) are not connected at this stage.
An 8-place NO momentary switch panel was constructed using a piece of
perfboard and eight miniature switches, and wired to the MCU GPIO pins 2
through 9. These are configured as active low, using the Arduino internal
pullups. The switch buttons are 3D-printed with flexible supports off a
central bracket.
The 'single folder' version of the code controls the player through the Arduino IDE console, using two-letter commands followed, where required, by a numeric argument. The parsing is quite flexible, looking only at the first two letters and any subsequent digits. This decoding of user input occurs at one place only and could easily be replaced with an alternate, such as IR receiver command codes, or decoded button presses.
The 'multi-folder' or 'named files' version of the code includes extra routines to handle an 8-key keypad. The console command control has been retained, so either is available. The keypad uses three keys to select the change mode (volume, file and folder) two keys to make the change (up and down) and three keys for special functions - equalization, playback mode and reset.
The code supports a 128x64 OLED display using I2C with a light-weight library. This can be easily removed.
Standby has not been implemented, and the Busy signal is not used. There are some user commands which are coded for but are not implemented. The code uses about 66% of the Pro Mini program storage space and a similar proportion of dynamic memory. This can be reduced by removing the console logging.PDF Document. Edited version of the original DFRobot Documentation
Player Version 1. 'Named File' mode. Arduino sketch to operate the player with a TF card organised into 1 to 99 folders named 01, 02 etc, each with up to 255 files named 001... 002... etc. This has been tested with 19 folders and about 200-240 files per folder.
Player Version 2. 'Single Folder' mode. Arduino sketch to operate the player with a TF card with one folder named MP3 and many files in the folder, with any naming. This has been tested with about 3,000 files in the folder.
 This site was last updated 18th
August 2024.